In the sixth exercise, we should integrate (actually back in the two groups) the results from the fifth exercise in a 3D SketchUp model. This should be modeled by the possible scale of 1:1. As a basis, we got an AutoCAD file of the particular place that I first imported into SketchUp. Then I draw with a pencil in each SketchUp a polyline around the area to capture them with it. After I drew the faces, I started the building with the function this pull. And I oriented myself to the floor numbers of the building (each floor about 3 m). So I had put up a facade, to which I could now add the pictures in Exercise 5. The images I adapted first to the width of the facade, to then have to correct the height of the building, since I could now focus on the height of the image. The roofs
I constructed in abstract form. Dormers, I constructed on the roof on it. For the dormers, I first cut a "small facade from the rectified image, for example, only one window, which was then constructed on each of the dormers. The LBS Buildings were added to the two smaller dormers back slightly. Therefore I have drawn here is a small guide to the back, which I have then designed a small dormer, and for this its own small front cut and paste.
The surrounding buildings, I also pulled up and all consistent with "white plaster" colored.
Next, the place was even remember: I was initially in the streets surrounding the square to get him to span Sun On the square itself, I then drew the road that goes once around the parking area and another entrance and an exit for the parking garage.
On the ground I asked a few cars that I had initially downloaded from the SketchUp page in a package as I do with the standard car is not so much. The two trees I've put on the square.
Next, I stopped at "Window" the "shadow". This opens a window where you can set the desired date and time. In this case, 2.2. at 11.45 clock. Then you only have "Show shadow" still has the hooks in place and you get the exact shade of course this time.
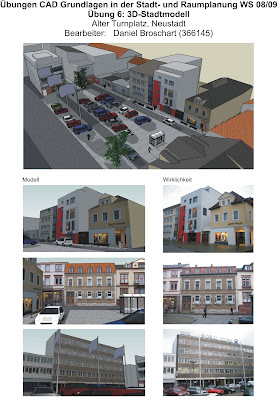
As this exercise should be re-plotted, first had pictures taken of the SketchUp model. This one must first position the camera. Then you can look around where you can easily rotate the view. Once you set the desired position for the picture, you can go to "File" "Export" and then "2D graphics. A screen image is created that can be saved as. Jpg file. In this way, I made four pictures of the views towards the NE, NW, SE and SW and is organized under my plan. The finished plan was plotted and fired the SketchUp model layout plan (as. Pdf and. Jpg), and the folder with the original images and the rectified images to CD. Everything was then released together.
The finished plan:
Conclusion:
Working with SketchUp has a lot of fun. Sometimes it sucks a bit if you're not with the polyline, the areas may comprise the same, but otherwise, SketchUp can achieve a very successful and above all simply based program, in which one can be incorporated relatively quickly and very nice results.
0 comments:
Post a Comment