In the third exercise, we should re-create a small project with QGIS. Data base represents a topological map of Kaiserslautern and a shape file "TU_Kaiserslautern" dar.
TU_Kaiserslautern In the file, certain Building (1, 2, 3, 13, 16, 32, 34, 46, 49, 62, 63) of the University are recognized and certain attributes are entered.
After opening QGIS I created first a new project was a project title, the map units set to meters and as a Coordinate Reference System (KBS), I was once again Gauss-Kruger zone 2 (EPSG: 31 466) a.
(This project is the possibility to work either with a vector layer or multiple. First, I will describe how, if we stick to the task within the vector layer TU_Kaiserslautern. Below I will point out the possibility, to work with multiple layers of what you have to paying attention towards this approach and what are the advantages and disadvantages)
project properties. General

Project Properties: Coordinate Reference System (KBS)

After I made these preferences, I added first a layer TK25_6512schw.tif the grid, which should form the data base. Next, I added a layer TU_Kaiserslautern.shp the vector, which we have also been made available.
Next I began trying to capture the individual buildings. For this I chose the vector layer and switch processing status "clicked. Thus, various tools I needed to record the buildings usable. As it was in the area to be covered by buildings, I chose "digitize Polygon from. At first I tried to surround the buildings very well and I zoomed very close to the buildings. For that I needed but a lot of bases and the program crashed several times and my building outline was deleted. After several attempts, I decided to work with fewer points. "Digitize Polygon" The function do you speak about gradually a polyline around the building and the program calculates the resulting surface area developed.
"digitize Polygon

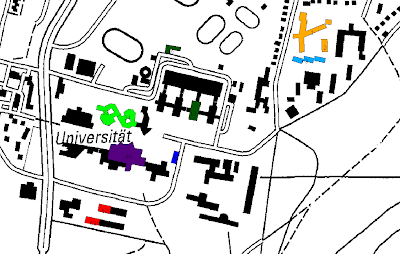
Has my drive around the building completely, simply close the area off with a right click. Then at once the window opens, into which you can enter the attributes of the digitized area just now. We should enter the building number in the "NO" and the relevant department in the "FB". So I went to all buildings prior to and after that, however, were all dyed the same color as I am always in TU_Kaiserslautern layer was. cut out
covered building

order in the buildings 32 and 34, the space in the middle, I turned the layer first in the properties of "representation" is a transparent, so that I areas could see. Then I selected the tool "Add Ring" and covered the land. After a final right-click this previously developed land in my area were cut. Then I turned the transparency off.
Building 49 was not on the topological map of Kaiserslautern, so I drew it free to enter after the submission of building plan.
Next I took care to see the descriptions of each building. They should be labeled with the building number. I dialed in the legend at TU_Kaiserslautern layer by right-clicking the layer properties again, where he went to the "labels" and put the check mark "show labels" to chose the description field "NO" and clicked OK. Thus, even see the building numbers.
Layer Properties: Set the caption

should also we color the building according to the respective departments. For this I chose again from the Layer Properties and clicked the 'Appearance' section. In "Legend Type" I chose the "unique value" and in the classification box I chose "FB" from. Then I clicked on "classification" and each of the individual subject areas was assigned a color. Since I was not particularly happy with these colors, there was one they could not easily distinguished from each other, I chose new colors. This I had to just click on the relevant department in the classification Preview and then change the fill color.
Layer Properties: Set the fill color

Legend:

The QGIS file and the image I burned to CD again to leave everything in the chair.
The finished project:
Screenshot entire screen:

another way: Working with multiple vector layers
Another possibility In this project, working with several vector layers would have been. I would have given the TU_Kaiserslautern.shp file copy multiple times and make a designation of the. Shp files for the respective departments have. The advantage would be that one single vector layer one-off and could and could result see individual departments.
The coloration of the layers in this case would have simply been made using the layer properties to "representation".
The downside would have been that the tax amount increased by the many added. Shp files had. Furthermore, one must in this way the settings for example, the label found in each layer individually.
example of such a legend:

And this work of art in this way:

0 comments:
Post a Comment